Using Jupyter notebooks with Papermill and Dagster
In this tutorial, we'll walk you through integrating a Jupyter notebook with Dagster using an example project. Before we get started, let's cover some common approaches to writing and integrating Jupyter notebooks with Dagster:
-
Doing standalone development in a Jupyter notebook. You could then create two Dagster assets: one for the notebook itself and another for data-fetching logic. This approach, which we'll use to start the tutorial, allows you to configure existing notebooks to work with Dagster.
-
Using existing Dagster assets as input to notebooks. If the data you want to analyze is already a Dagster asset, you can directly load the asset's value into the notebook. When the notebook is complete, you can create a Dagster asset for the notebook and factor any data-fetching logic into a second asset, if applicable. This approach allows you to develop new notebooks that work with assets that are already a part of your Dagster project.
By the end of this tutorial, you will:
- Explore a Jupyter notebook that fetches and explores a dataset
- Create a Dagster asset from the notebook
- Create a second Dagster asset that only fetches the dataset
- Load existing Dagster assets into a new Jupyter notebook
Dagster concepts
In this guide, we'll use the following Dagster concepts:
- Assets - An asset is a software object that models a data asset. The prototypical example is a table in a database or a file in cloud storage. An executed Jupyter notebook file can also be an asset! That's what we'll be creating in this guide.
- Definitions - A Dagster
Definitionsobject is a collection of Dagster objects, including assets. - I/O managers - An I/O manager handles storing and loading assets. In this guide, we'll be using a special I/O manager to store executed Jupyter notebook files.
Prerequisites
To complete this tutorial, you'll need:
-
To install Dagster and Jupyter. Run the following to install using pip:
- uv
- pip
uv add dagster notebookpip install dagster notebookRefer to the Dagster installation docs for more info.
-
To download the
tutorial_notebook_assetsDagster example and install its dependencies:dagster project from-example --name tutorial_notebook_assets --example tutorial_notebook_assets
cd tutorial_notebook_assets
pip install -e ".[dev]"This example includes:
-
A finished version of the tutorial project, which you can use to check out the finished project. This is the
tutorial_finishedsubfolder. -
A template version of the tutorial project, which you can use to follow along with the tutorial. This is the
tutorial_templatesubfolder. In this folder, you'll also find:assets, a subfolder containing Dagster assets. We'll use/assets.pyto write these.notebooks, a subfolder containing Jupyter notebooks. We'll use/notebooks/iris-kmeans.ipynbto write a Jupyter notebook.
-
Step 1: Explore the Jupyter notebook
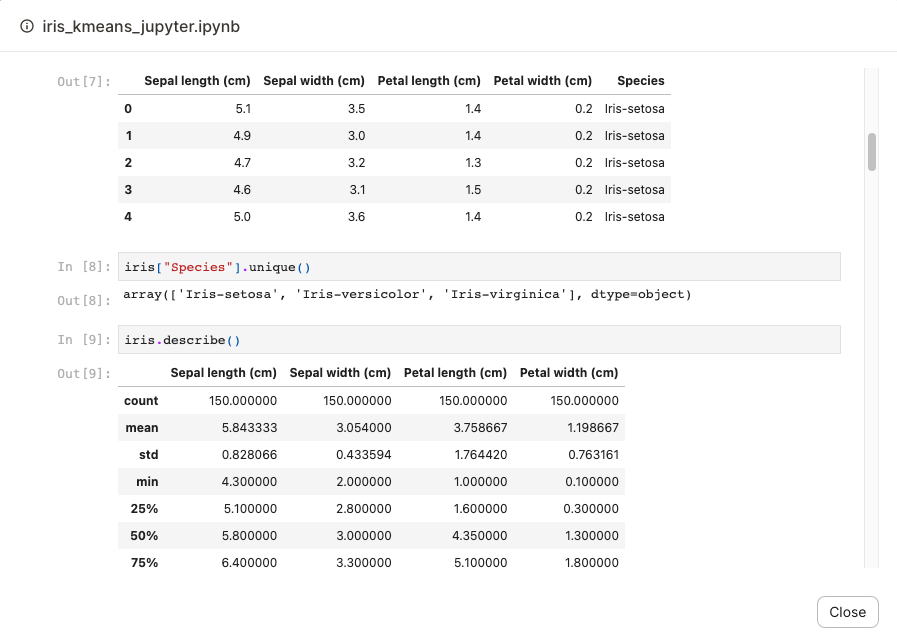
In this tutorial, we'll analyze the Iris dataset, collected in 1936 by the American botanist Edgar Anderson and made famous by statistician Ronald Fisher. The Iris dataset is a basic example of machine learning because it contains three classes of observation: one class is straightforwardly linearly separable from the other two, which can only be distinguished by more sophisticated methods.
The /tutorial_template/notebooks/iris-kmeans.ipynb Jupyter notebook, which is already completed for you, does some analysis on the Iris dataset.
In the Jupyter notebook, we first fetch the Iris dataset:
# /tutorial_template/notebooks/iris-kmeans.ipynb

iris = pd.read_csv(
    "https://archive.ics.uci.edu/ml/machine-learning-databases/iris/iris.data",
    names=[
        "Sepal length (cm)",
        "Sepal width (cm)",
        "Petal length (cm)",
        "Petal width (cm)",
        "Species",
    ],
)
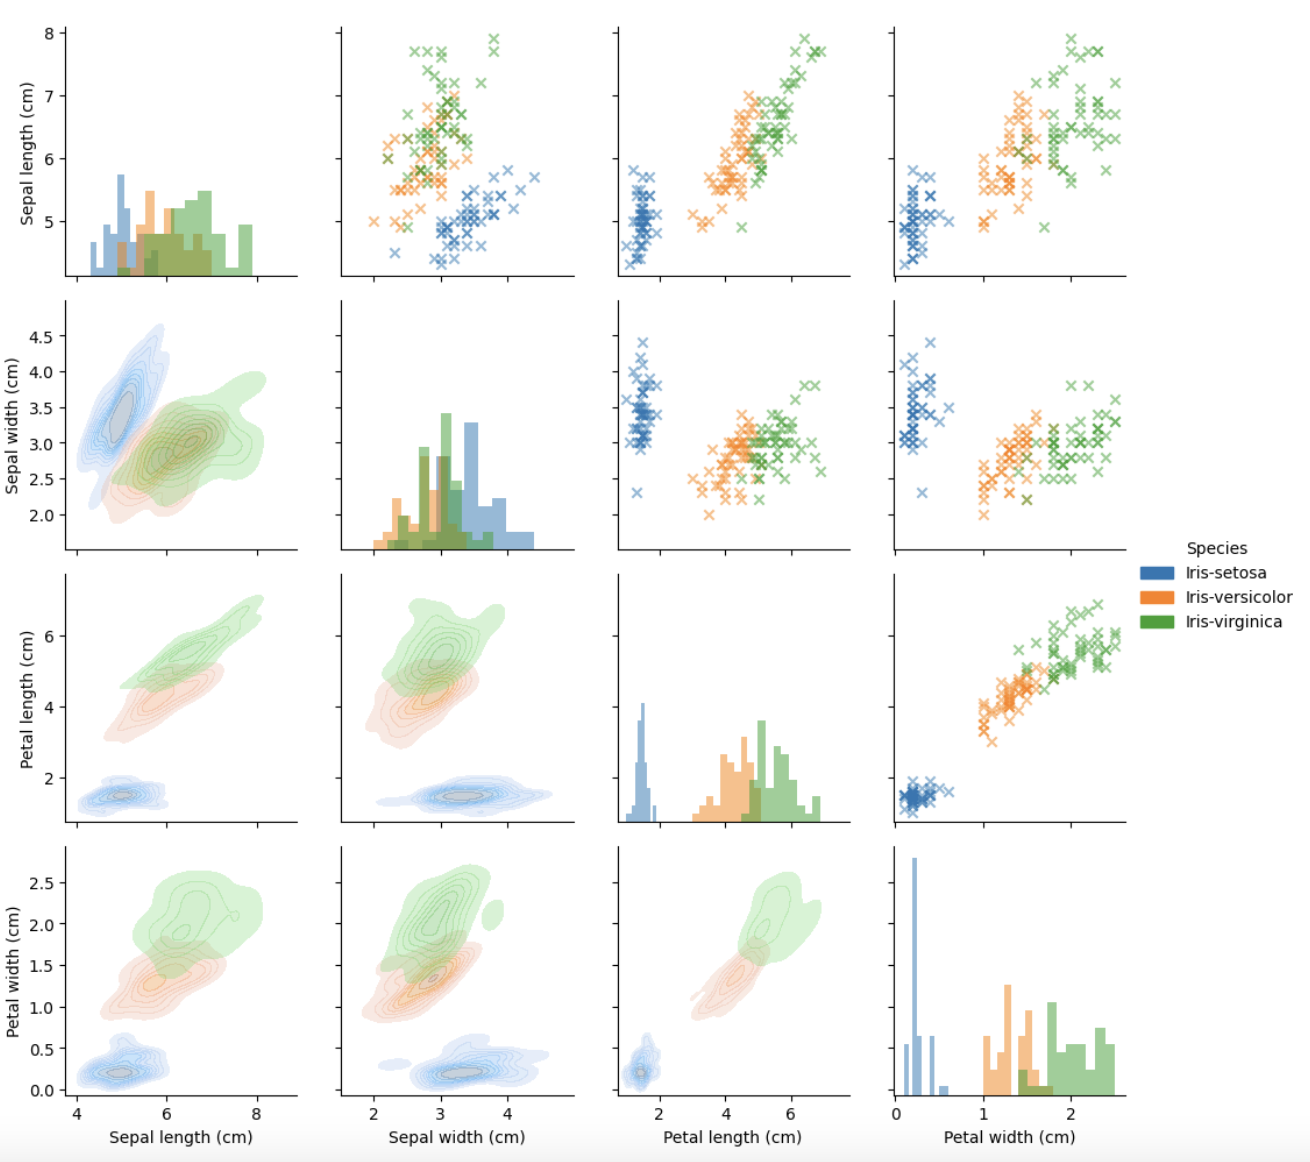
Next, we'll perform some descriptive analysis to explore the dataset. If you execute these cells, several plots of the Iris dataset will be created:
Next, we conduct our K-means analysis:
estimator = sklearn.cluster.KMeans(n_clusters=3)
estimator.fit(
    iris[["Sepal length (cm)", "Sepal width (cm)", "Petal length (cm)", "Petal width (cm)"]]
)
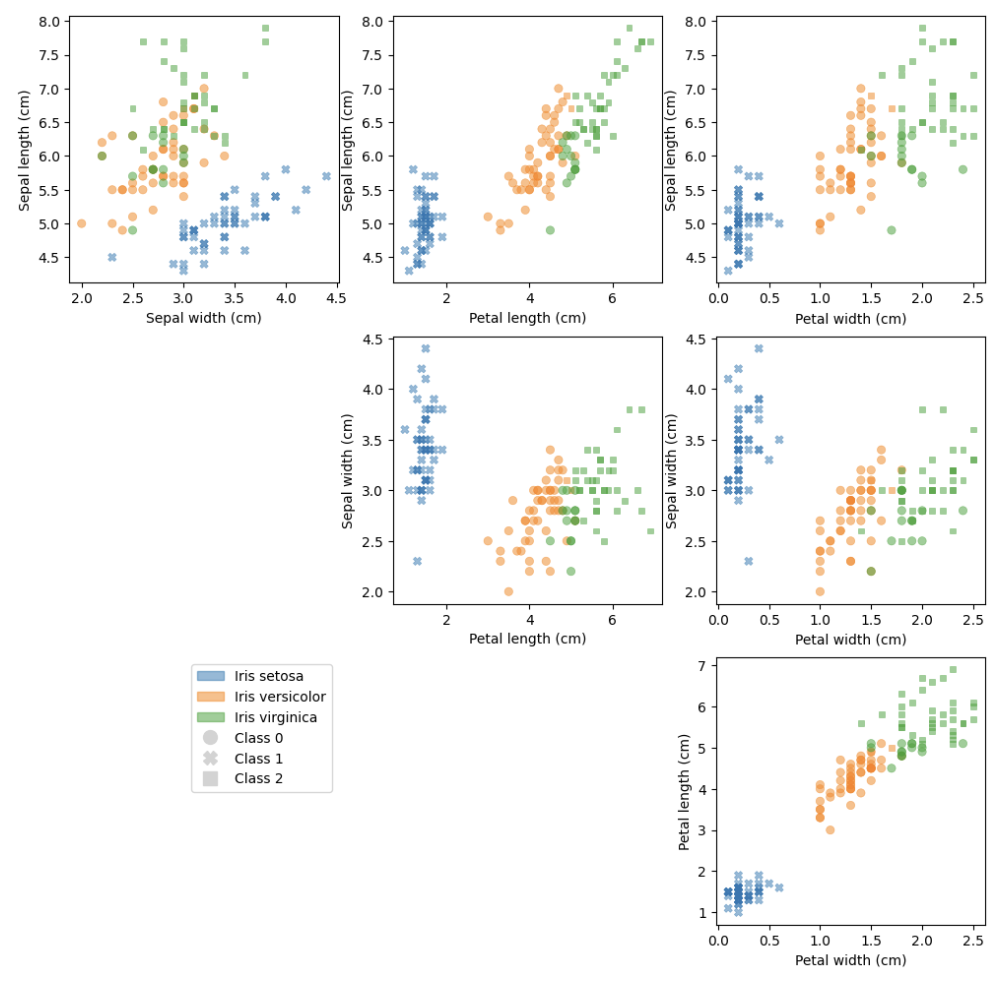
Lastly, we plot the results of the K-means analysis. From the plots, we can see that one species of Iris is separable from the other two, but a more sophisticated model will be required to distinguish the other two species:
Like many notebooks, this example does some fairly sophisticated work, including producing diagnostic plots and a statistical model. For now, this work is locked away in the .ipynb format, only reproducible using a complex Jupyter setup, and only programmatically accessible within the notebook context. We'll address this in the remainder of the tutorial.
Step 2: Create a Dagster asset from the Jupyter Notebook
By creating a Dagster asset from our notebook, we can integrate the notebook as part of our data platform. This enables us to make its contents more accessible to developers, stakeholders, and other assets in Dagster.
To create a Dagster asset from a Jupyter notebook, we can use the define_dagstermill_asset function. In /tutorial_template/assets.py add the following code snippet:
# /tutorial_template/assets.py

from dagstermill import define_dagstermill_asset
from dagster import file_relative_path

iris_kmeans_jupyter_notebook = define_dagstermill_asset(
    name="iris_kmeans_jupyter",
    notebook_path=file_relative_path(__file__, "notebooks/iris-kmeans.ipynb"),
    group_name="template_tutorial",
)
If you are following along in the template code, uncomment the code block under the TODO 1 comment.
Using define_dagstermill_asset, we've created and returned a Dagster asset. Let's take a look at the arguments we provided:
name- This argument names the asset, in this caseiris_kmeans_jupyternotebook_path- This argument tells Dagster where to find the notebook the asset should use as a source. In this case, that's our/notebooks/iris-kmeans.ipynbfile.group_name- This optional argument places the asset into a group namedtemplate_tutorial, which is helpful for organizating your assets in the UI.
When materialized, the iris_kmeans_jupyter asset will execute the notebook (/notebooks/iris-kmeans.ipynb) and store the resulting .ipynb file in a persistent location.
Step 3: Add a Dagster Definitions object and supply an I/O manager
We want to execute our Dagster asset and save the resulting notebook to a persistent location. This is called materializing the asset and to do this, we need to add the asset to a Dagster Definitions object.
Additionally, we need to provide a resource to the notebook to tell Dagster how to store the resulting .ipynb file. We'll use an I/O manager to accomplish this.
Open the /tutorial_template/definitions.py file and add the following code:
# tutorial_template/definitions.py

from dagster import load_assets_from_modules, Definitions
from dagstermill import ConfigurableLocalOutputNotebookIOManager

from . import assets

defs = Definitions(
    assets=load_assets_from_modules([assets]),
    resources={
        "output_notebook_io_manager": ConfigurableLocalOutputNotebookIOManager()
    }
)
Let's take a look at what's happening here:
-
Using
load_assets_from_modules, we've imported all assets in theassetsmodule. This approach allows any new assets we create to be automatically added to theDefinitionsobject instead of needing to manually add them one by one. -
We provided a dictionary of resources to the
resourcesparameter. In this example, that's theConfigurableLocalOutputNotebookIOManagerresource.This I/O manager, bound to the
output_notebook_io_managerkey, is responsible for handling the storage of the notebook asset's resulting.ipynbfile.
Step 4: Materialize the notebook asset
Now that you've created an asset, a resource, and a Definitions object, it's time to materialize the notebook asset! Materializing an asset runs the op it contains and saves the results to persistent storage.
-
To start the Dagster UI, run the following in
/tutorial_template:dagster devWhich will result in output similar to:
Serving dagster-webserver on http://127.0.0.1:3000 in process 70635 -
In your browser, navigate to http://127.0.0.1:3000. The page will display the notebook asset in the Asset Graph.
If you click the notebook asset, a sidebar containing info about the asset will slide out from the right side of the page. In the Description section of the panel is a View Source Notebook button:

This button allows you to view the notebook directly in the UI. When clicked, Dagster will render the notebook - referenced in the
notebook_pathparameter - that'll be executed when theiris_kmeans_jupyterasset is materialized: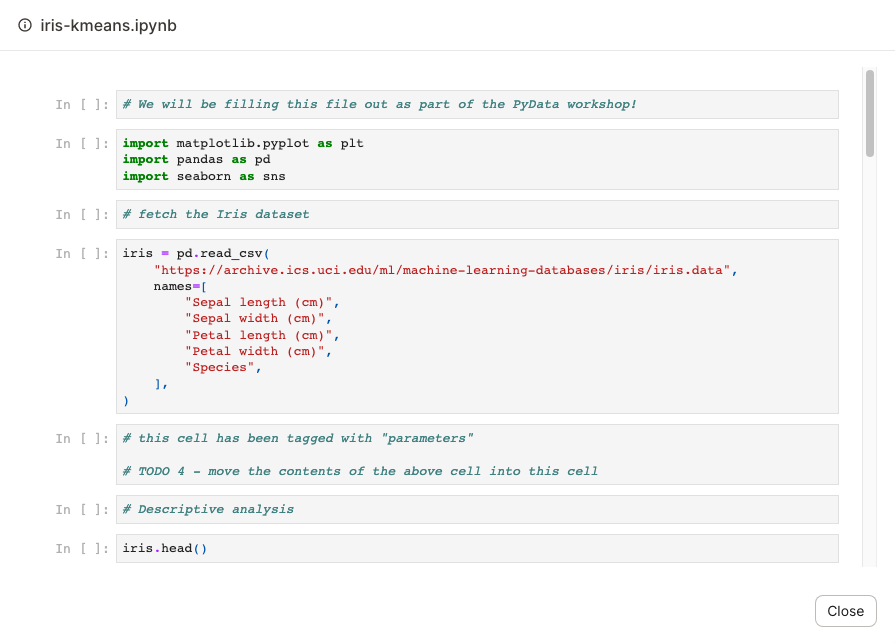
-
Click the Materialize button. To view the execution as it happens, click the View button in the alert that displays.
After the run completes successfully, you can view the executed notebook in the UI. Click the asset again and locate the View Notebook button in the Materialization in Last Run section of the sidebar:
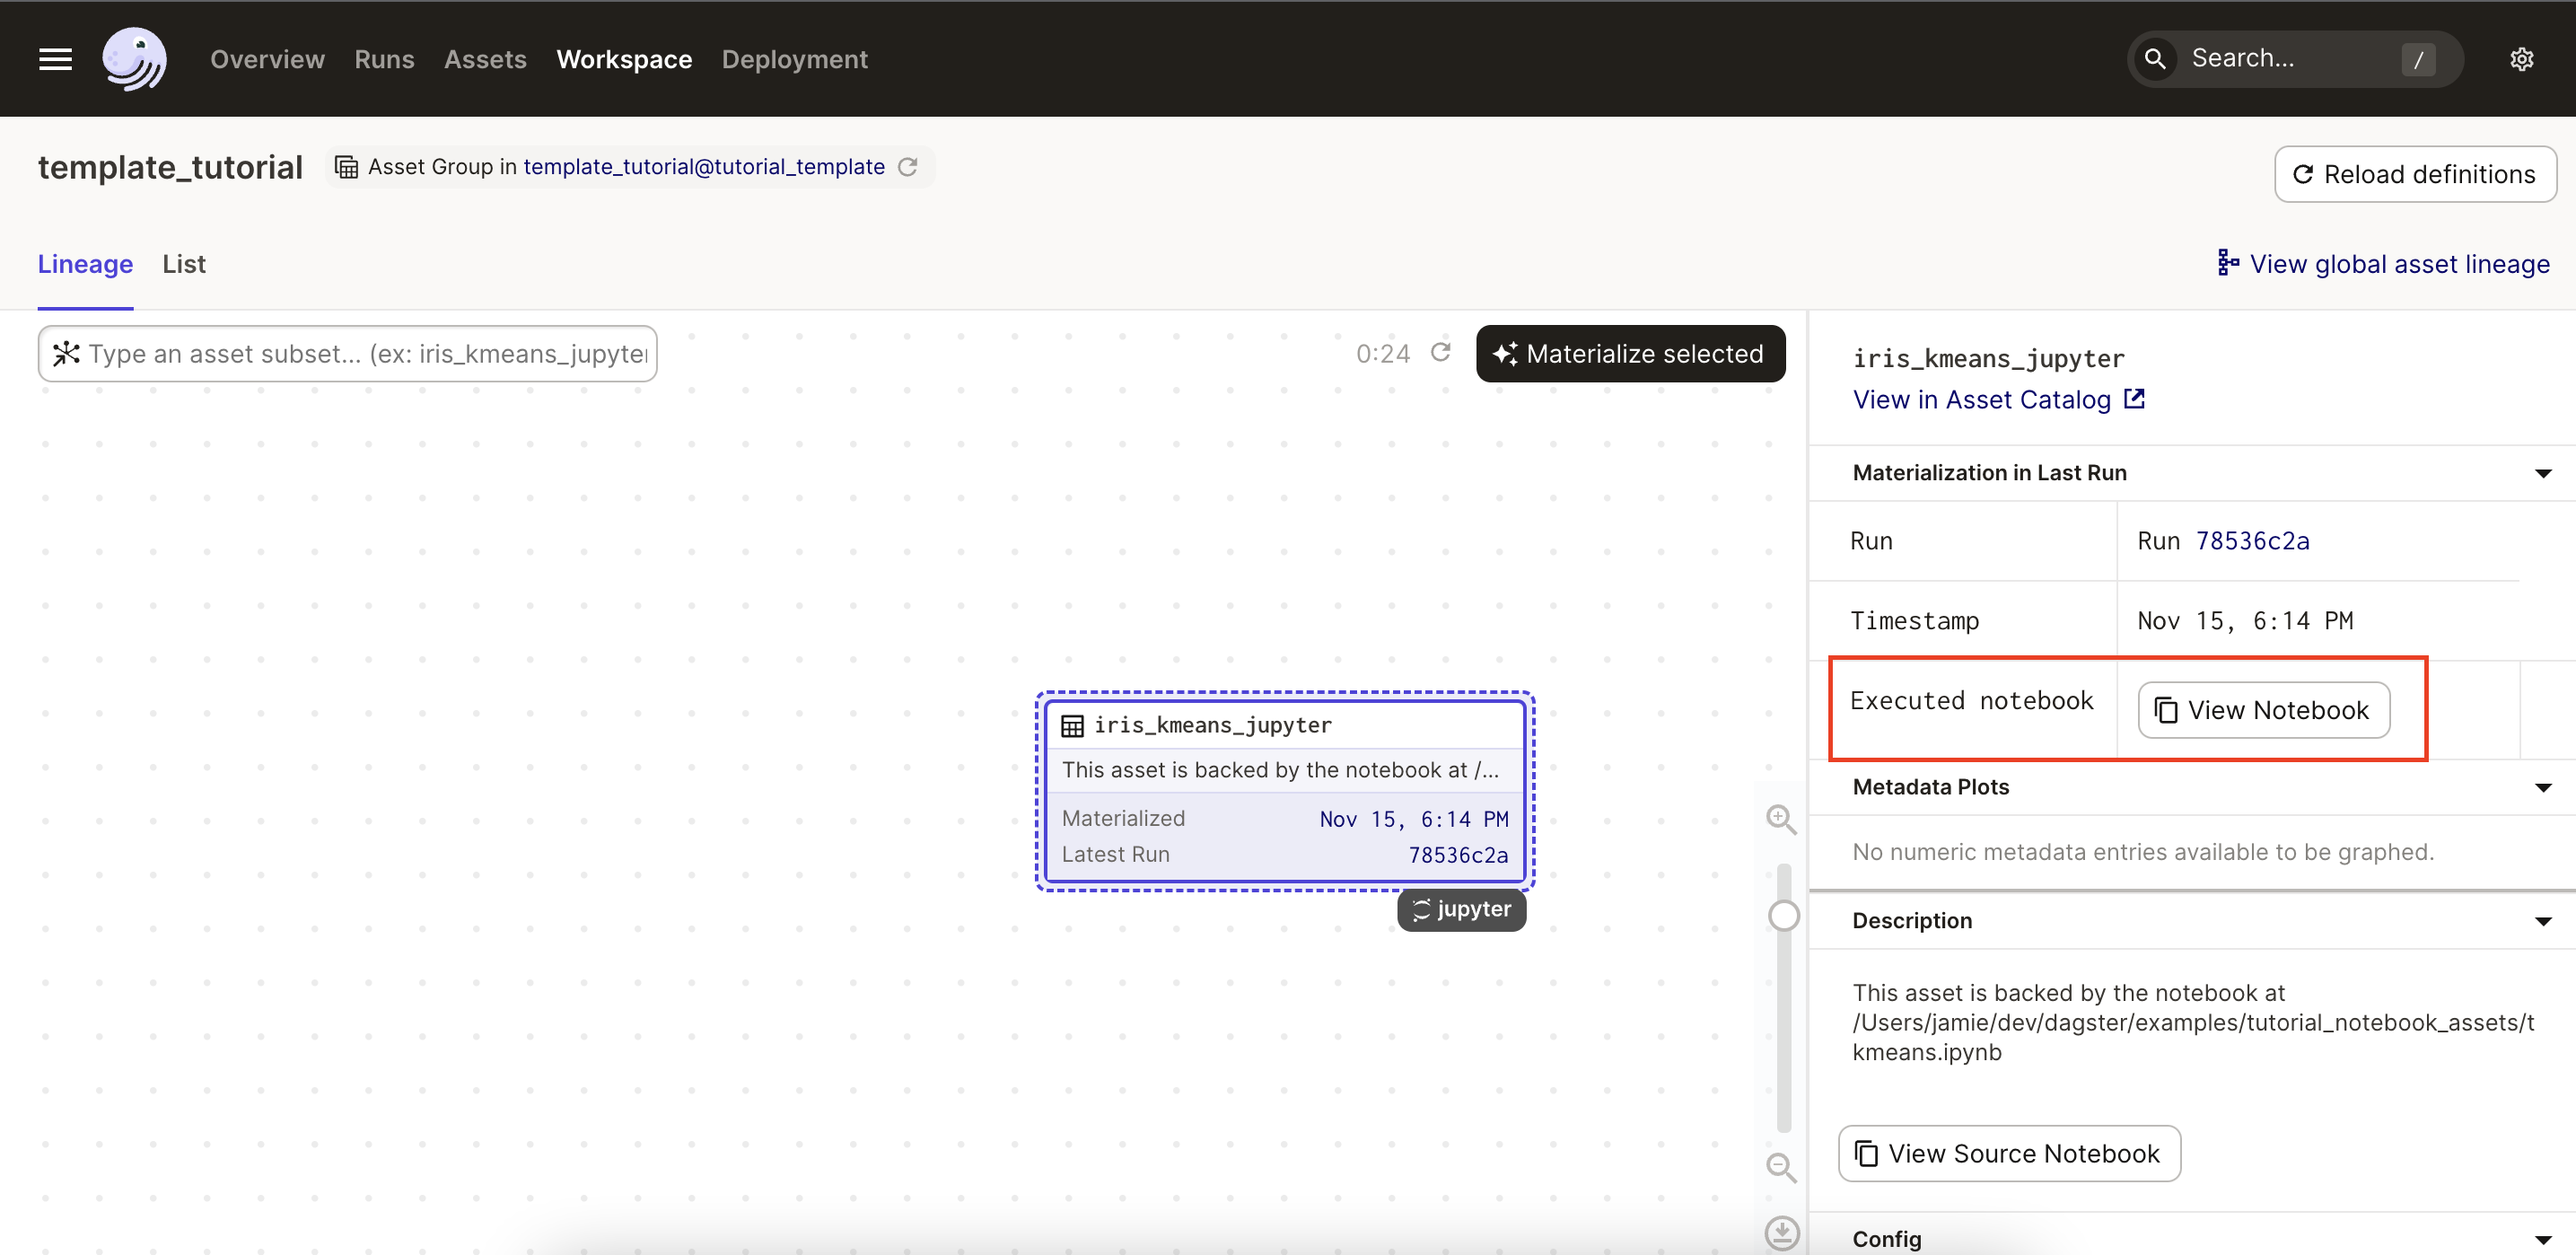
Click the button to display the executed notebook - specifically, the notebook that was executed and written to a persistent location:
Step 5: Add an upstream asset
While our iris-kmeans notebook asset now materializes successfully, there are still some improvements we can make. The beginning of the notebook fetches the Iris dataset, which means that every time the notebook is materialized, the data is re-fetched.
To address this, we can factor the Iris dataset into its own asset. This will allow us to:
-
Use the asset as input to additional notebooks. This means all notebooks analyzing the Iris dataset will use the same source data, which we only have to fetch once.
-
Materialize notebooks without fetching data for each materialization. Instead of making potentially expensive API calls, Dagster can fetch the data from the previous materialization of the Iris dataset and provide that data as input to the notebook.
In this step, you'll:
Step 5.1: Create the Iris dataset asset
To create an asset for the Iris dataset, add the following code to /tutorial_template/assets.py:
# /tutorial_template/assets.py

from dagstermill import define_dagstermill_asset
from dagster import asset, file_relative_path
import pandas as pd

@asset(
    group_name="template_tutorial"
)
def iris_dataset():
    return pd.read_csv(
        "https://archive.ics.uci.edu/ml/machine-learning-databases/iris/iris.data",
        names=[
            "Sepal length (cm)",
            "Sepal width (cm)",
            "Petal length (cm)",
            "Petal width (cm)",
            "Species",
        ],
    )
If you're following along in the template tutorial, uncomment the code block under the TODO 2 comment.
Let's go over what's happening in this code block:
- Using
@dg.asset, we create a standard Dagster asset. The name of the Python function (iris_dataset) is the name of the asset. - As with the
iris_kmeans_jupyterasset, we set thegroup_nameparameter to organize our assets in the UI. - The body of the Python function fetches the Iris dataset, renames the columns, and outputs a Pandas DataFrame.
Step 5.2: Provide the iris_dataset asset to the notebook asset
Next, we need to tell Dagster that the iris_dataset asset is input data for the iris-kmeans notebook. To do this, add the ins parameter to the notebook asset:
# tutorial_template/assets.py
from dagstermill import define_dagstermill_asset
from dagster import asset, file_relative_path, AssetIn
import pandas as pd

# iris_dataset asset removed for clarity

iris_kmeans_jupyter_notebook = define_dagstermill_asset(
    name="iris_kmeans_jupyter",
    notebook_path=file_relative_path(__file__, "notebooks/iris-kmeans.ipynb"),
    group_name="template_tutorial",
    ins={"iris": AssetIn("iris_dataset")}, # this is the new parameter!
)
If you are following along with the template tutorial, uncomment the line with the TODO 3 comment.
The ins parameter tells Dagster that the iris_dataset asset should be mapped to a variable named iris in our notebook. Recall that in our iris-kmeans notebook, the Iris dataset is assigned to a variable named iris.
Step 5.3: Modify the notebook
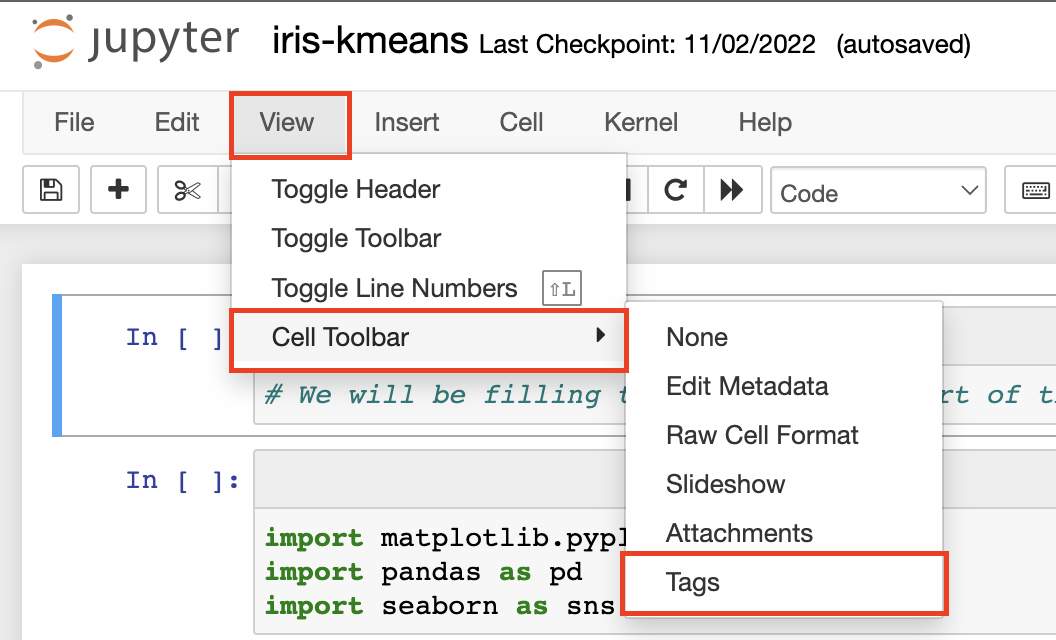
We need to make a small change in our Jupyter notebook to allow Dagster to supply the iris_dataset asset as input. Behind the scenes, Dagster uses papermill to inject parameters into notebooks. papermill works by replacing a notebook cell with the parameters tag with a custom cell that can fetch the desired data.
To accomplish this, we need to tag the cell in the iris-kmeans notebook that fetches the Iris dataset. This allows us to replace the cell with the data-fetching logic that loads the iris_dataset asset and retain the ability to run the Jupyter notebook in a standalone context. We'll cover this in more detail later in the tutorial.
To add the parameters tag, you may need to turn on the display of cell tags in Jupyter:
-
In Jupyter, navigate to View > Cell Toolbar > Tags:
-
Click Add Tag to add a
parameterstag: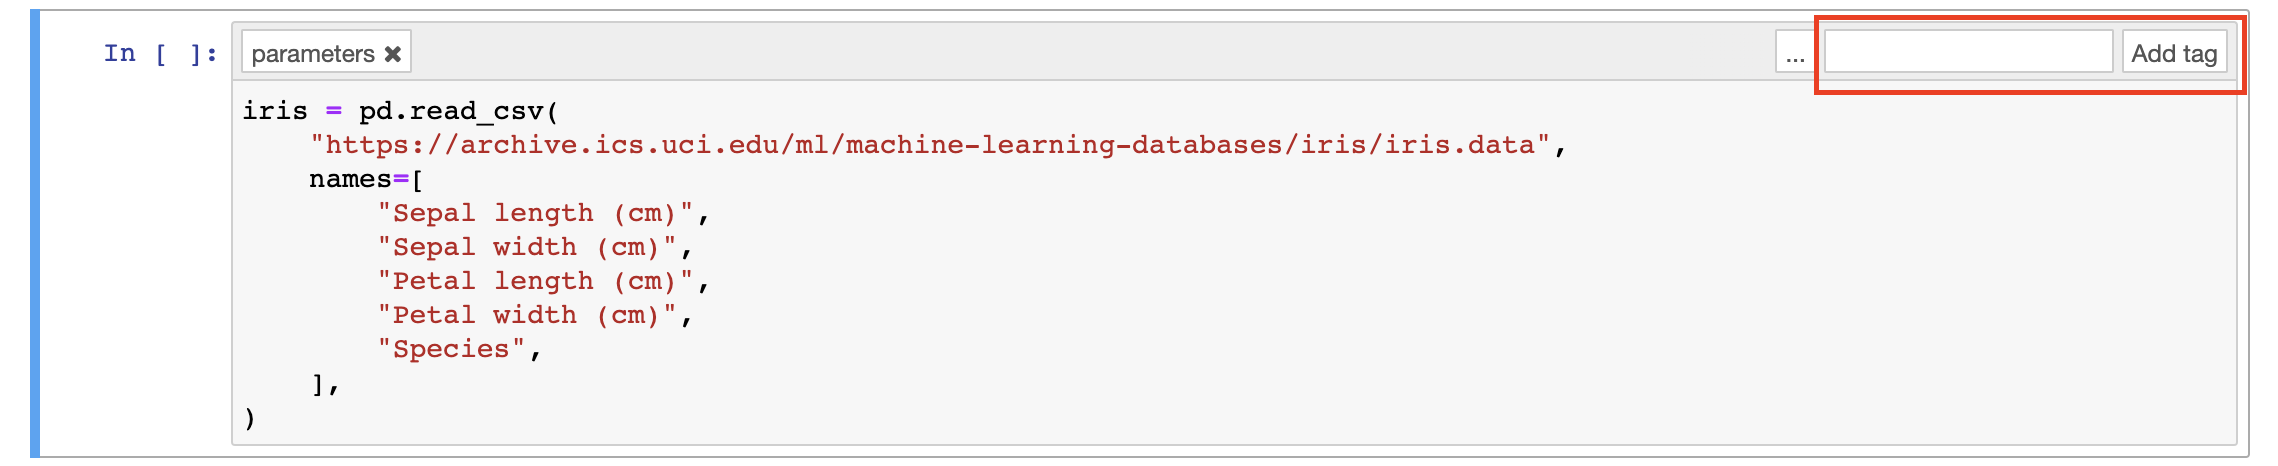
Step 6: Materialize the assets
Next, we'll materialize our iris_dataset and notebook assets.
-
In the UI, open the Asset Graph page.
-
Click the Reload definitions button. This ensures that the UI picks up the changes you made in the previous steps.
At this point, the
iris_datasetasset should display above theiris_kmeans_jupyterasset as an upstream dependency: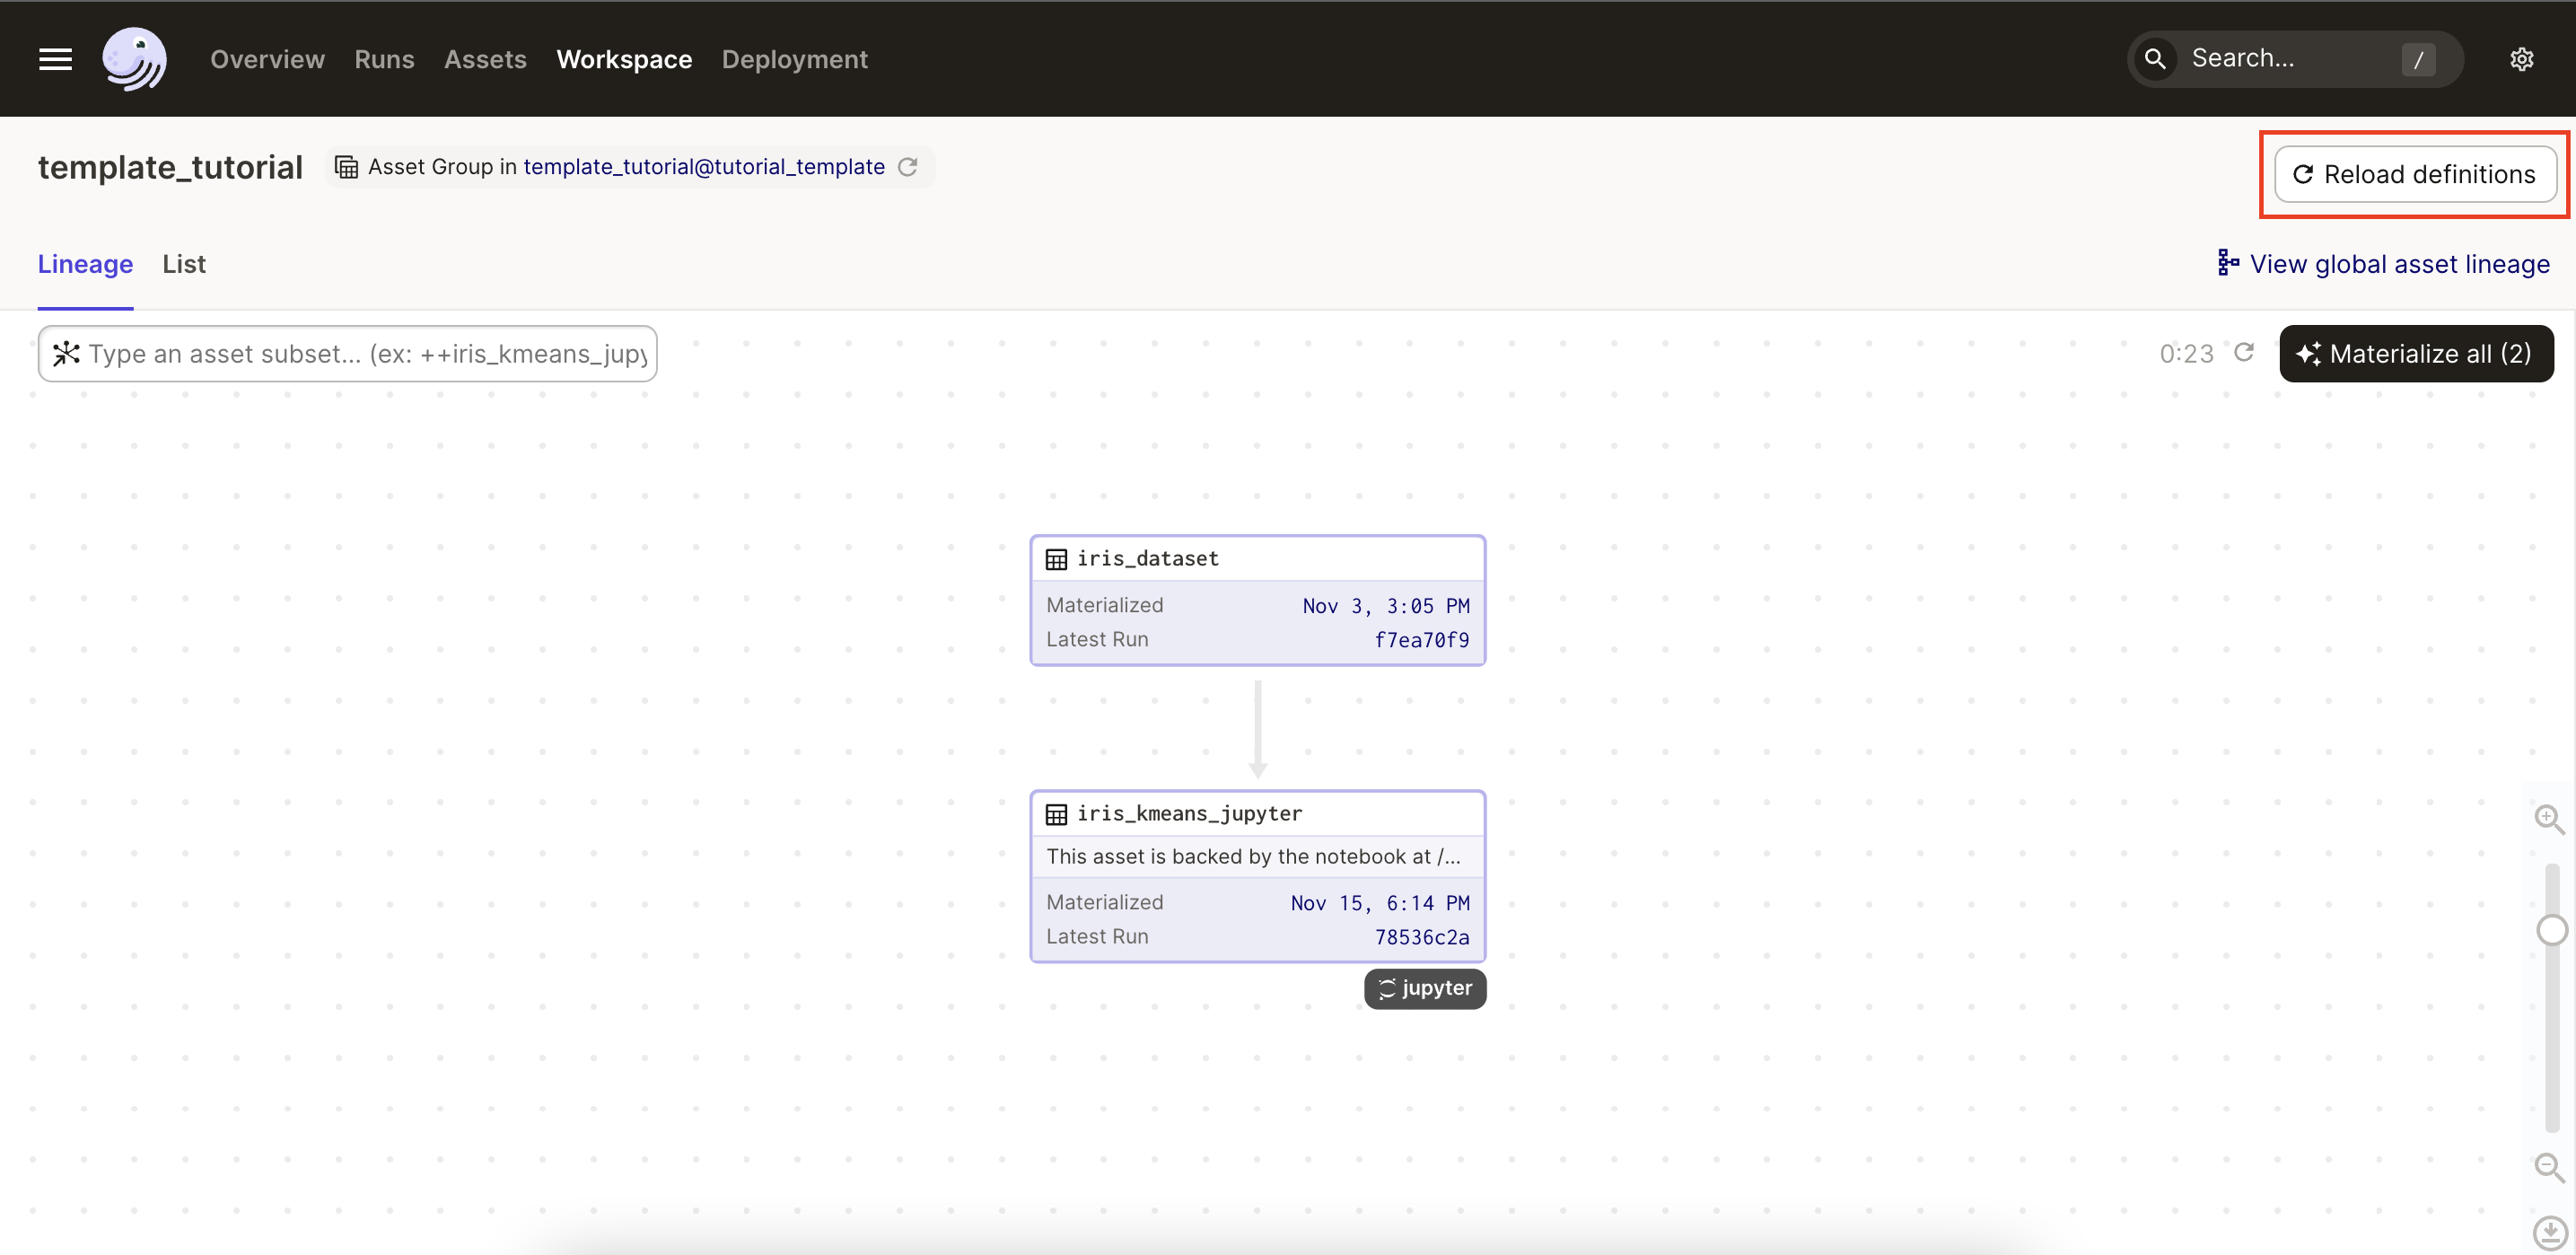
-
Click the Materialize all button near the top right corner of the page, which will launch a run to materialize the assets.
That's it! You now have working Jupyter and Dagster assets!
Extra credit: Fetch a Dagster asset in a Jupyter notebook
What if you want to do additional analysis of the Iris dataset and create a new notebook? How can you accomplish this without duplicating code or re-fetching data?
The answer is simple: use the iris_dataset Dagster asset!
In the Jupyter notebook, import the Dagster Definitions object and use the Definitions.load_asset_value function to load the data for the iris_dataset asset we created in Step 5.1: Create the Iris dataset asset:
from tutorial_template import template_tutorial

iris = template_tutorial.load_asset_value("iris_dataset")
Then, whenever you run the notebook using Jupyter, you'll be able to work with the iris_dataset asset:
jupyter notebook /path/to/new/notebook.ipynb
Behind the scenes, when load_asset_value is called, Dagster fetches the value of iris_dataset that was most recently materialized and stored by an I/O manager.
To integrate the new notebook, follow the steps from Step 5.3 to add the parameters tag to the cell that fetches the iris_dataset asset via load_asset_value.
Conclusion
Now we have successfully created an asset from a Jupyter notebook and integrated it with our Dagster project! To learn about additional dagstermill features, see the Dagstermill integration reference.