Configuring branch deployments with GitHub or GitLab
This feature is only available in Dagster+.
This guide covers setting up branch deployments for a Dagster project in Dagster+ Serverless or Hybrid with GitHub or GitLab. Once you've set up branch deployments, any time you create or update a pull request (or merge request) in your project repository, an associated branch deployment will automatically be created or updated in Dagster+.
Output created from a branch deployment -- such as a database, table, etc. -- won't be automatically removed from storage once a branch is merged or closed. For more information on handling this output, see the best practices section.
Dagster+ Serverless
Branch deployments are automatically configured for Serverless deployments when you configure CI/CD. For more information, see the CI/CD configuration guide.
Dagster+ Hybrid
To follow the steps in this section, you'll need:
- Organization Admin permissions in Dagster+.
- The ability to run a new agent in your infrastructure.
Step 1: Configure CI/CD�
Follow the CI/CD configuration guide to set up CI/CD for Dagster+ Hybrid with your preferred Git provider.
Step 2: Create a branch deployment agent or update your production agent config
While you can use your existing production agent for branch deployments on Dagster+ Hybrid, we strongly recommend creating a dedicated branch deployment agent. This ensures that your production instance isn't negatively impacted by the workload associated with branch deployments.
- Amazon ECS
- Docker
- Kubernetes
- Dedicated branch deployment agent (recommended)
- Existing production agent
-
Deploy an ECS agent to serve your branch deployments.
- To create a new agent, follow the ECS agent setup guide, making sure to set the Enable branch deployments parameter if using the CloudFormation template.
- To upgrade an existing agent, follow the upgrade guide to ensure your template is up-to-date. Then, turn on the Enable branch deployments parameter.
-
Create a private Amazon Elastic Registry (ECR) repository. For instructions, see the AWS ECR documentation.
-
After you have created a new ECR repository, navigate back to the list of ECR repositories. In the list, locate the repository and its URI. Copy the URI to a separate text file, as you'll need it in a later step.

-
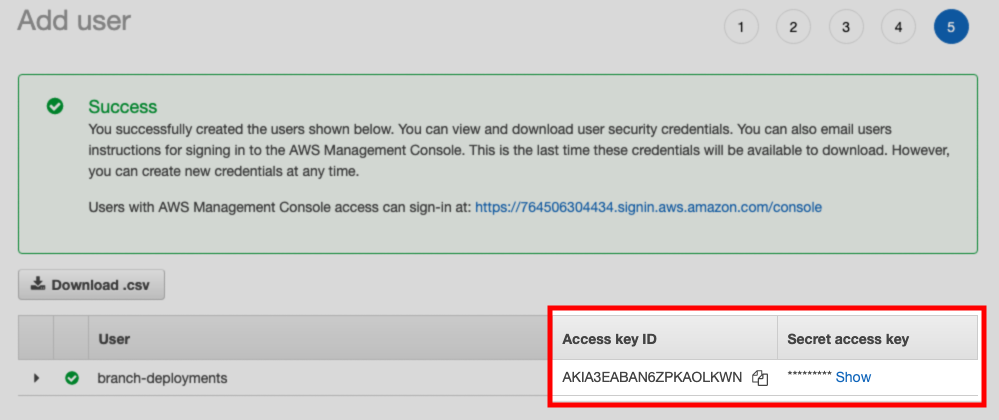
Create an IAM user. This user must:
- Have push access to the ECR repository, and
- Have programmatic access to AWS using an access key
-
After the user is created, save the Access key ID and Secret access key values shown on the confirmation page:
To update an existing production ECS agent, sign in to the AWS Management Console and modify the Dagster+ CloudFormation stack template with a text editor or AWS Infrastructure Composer. You will need to set EnableBranchDeployments to true:
EnableBranchDeployments: true
- Dedicated branch deployment agent (recommended)
- Existing production agent
- Set up a new Docker agent. For instructions, see the Docker agent setup guide.
- After the agent is set up, modify the
dagster.yamlfile as follows:- Set the
dagster_cloud_api.branch_deploymentsfield totrue - Remove any
deploymentfield(s)
- Set the
For example:
instance_class:
  module: dagster_cloud.instance
  class: DagsterCloudAgentInstance

dagster_cloud_api:
  agent_token:
    env: DAGSTER_AGENT_TOKEN
  branch_deployments: true ## true enables branch deployments

user_code_launcher:
  module: dagster_cloud.workspace.docker
  class: DockerUserCodeLauncher
  config:
    networks:
      - dagster_cloud_agent
    server_ttl:
      enabled: true
      ttl_seconds: 7200 #2 hours
Modify your production agent's dagster.yaml file to set the dagster_cloud_api.branch_deployments field to true. For example:
instance_class:
  module: dagster_cloud.instance
  class: DagsterCloudAgentInstance

dagster_cloud_api:
  agent_token:
    env: DAGSTER_AGENT_TOKEN
  branch_deployments: true ## true enables branch deployments
  deployment: prod

user_code_launcher:
  module: dagster_cloud.workspace.docker
  class: DockerUserCodeLauncher
  config:
    networks:
      - dagster_cloud_agent
    server_ttl:
      enabled: true
      ttl_seconds: 7200 #2 hours
- Dedicated branch deployment agent (recommended)
- Existing production agent
-
Set up a new Kubernetes agent. For instructions, see the Kubernetes agent setup guide.
-
After the agent is set up, modify your Helm values file to include the following:
dagsterCloud:
  branchDeployments: true
  workspace:
    serverTTL:
      enabled: true
      ttlSeconds: 7200
Modify your production agent's Helm values file to enable branch deployments:
dagsterCloud:
  branchDeployments: true
  deployments:
    - prod
  workspace:
    serverTTL:
      enabled: true
      ttlSeconds: 7200
Step 3: Update build.yaml with the branch deployment agent
In the build.yaml file, replace build.registry with the registry used by the agent you created in step 2.
For example:
locations:
  - location_name: example_location
    code_source:
      python_file: repo.py
    build:
      directory: ./example_location
      registry: 764506304434.dkr.ecr.us-east-1.amazonaws.com/branch-deployment-agent
In older deployments, you may have a dagster_cloud.yaml file instead of a build.yaml file.
Step 4: Add secrets to your Git provider
- GitHub
- GitLab
- In your GitHub repository, click the Settings tab.
- In the Security section of the sidebar, click Secrets > Actions.
- Click New repository secret.
- In the Name field, enter the name of the secret. For example,
DAGSTER_CLOUD_URL - In the Value field, paste the value of the secret.
- Click Add secret.
Repeat steps 3-6 for each of the secrets required for the registry used by the agent you created in step 1. See below for more details:
- Docker
- Amazon ECR
- Google Container Registry (GCR)
DAGSTER_CLOUD_URL- Your Dagster+ base URL (https://my_org.dagster.cloud)DOCKERHUB_USERNAME- Your DockerHub usernameDOCKERHUB_TOKEN- A DockerHub access token
DAGSTER_CLOUD_URL- Your Dagster+ base URL (https://my_org.dagster.cloud)AWS_ACCESS_KEY- The Access key ID of the AWS IAM user you created in step 3AWS_SECRET_ACCESS_KEY- The Secret access key of the AWS IAM user you created in step 3AWS_REGION- The AWS region where your ECR registry is located
DAGSTER_CLOUD_URL- Your Dagster+ base URL (https://my_org.dagster.cloud)GCR_JSON_KEY- Your GCR JSON credentials
- In your GitLab repository, click Settings > CI/CD.
- On the settings page, click Variables.
- Under Project variables, click Add variable.
- In the Key field, enter the name of the secret. For example,
DAGSTER_CLOUD_URL. - In the Value field, paste the value of the secret.
- Update the type, environments, visibility, flags, and description fields as needed.
- Click Add variable.
Repeat steps 3-6 for each of the secrets required for the registry used by the agent you created in step 1. See below for more details:
- Docker
- Amazon ECR
- Google Container Registry (GCR)
DAGSTER_CLOUD_URL- Your Dagster+ base URL (https://my_org.dagster.cloud)DOCKERHUB_USERNAME- Your DockerHub usernameDOCKERHUB_TOKEN- A DockerHub access token
DAGSTER_CLOUD_URL- Your Dagster+ base URL (https://my_org.dagster.cloud)AWS_ACCESS_KEY- The Access key ID of the AWS IAM user you created in step 3AWS_SECRET_ACCESS_KEY- The Secret access key of the AWS IAM user you created in step 3AWS_REGION- The AWS region where your ECR registry is located
DAGSTER_CLOUD_URL- Your Dagster+ base URL (https://my_org.dagster.cloud)GCR_JSON_KEY- Your GCR JSON credentials
Accessing branch deployments
Once configured, branch deployments can be accessed:
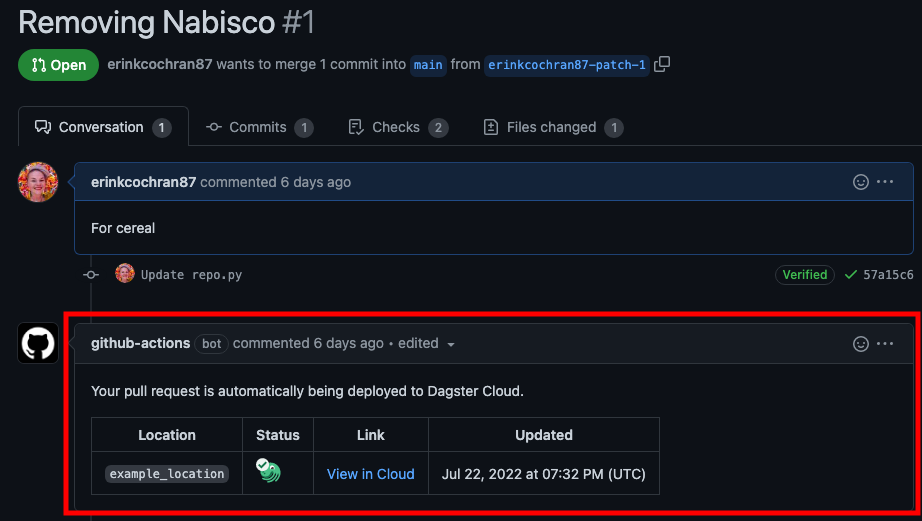
- From a GitHub pull request
- In Dagster+
Every pull request in the repository contains a View in Cloud link, which will open a branch deployment - or a preview of the changes - in Dagster+.
To access a branch deployment in Dagster+, you need permissions that grant you access to branch deployments and the code location associated with the branch deployment.
You can also access branch deployments directly in Dagster+ from the deployment switcher:

Changing the base deployment
The base deployment has two main purposes:
- It sets which full deployment is used to propagate Dagster+ managed environment variables that are scoped for branch deployments.
- It is used in the UI to track changes to the branch deployment from its parent full deployment.
The default base for branch deployments is prod. To configure a different full deployment as the base, follow the steps in Configuring branch deployments with the dagster-cloud CLI to create a branch deployment using the dagster-cloud CLI, and specify the deployment with the optional --base-deployment-name parameter.
Best practices
To ensure the best experience when using branch deployments, we recommend:
- Configuring jobs based on environment. Dagster automatically sets environment variables containing deployment metadata, allowing you to parameterize jobs based on the executing environment. Use these variables in your jobs to configure things like connection credentials, databases, and so on. This practice will allow you to use branch deployments without impacting production data.
- Creating jobs to automate output cleanup. As branch deployments don't automatically remove the output they create, you may want to create an additional Dagster job to perform the cleanup.