Using branch deployments with the dagster-cloud CLI
This guide is applicable to Dagster+.
In this article, we'll walk you through setting up branch deployments with a general continuous integration (CI) or git platform, using the dagster-cloud CLI.
Using this approach to branch deployments may be a good fit if:
- You don't use GitHub for version control
- You use an alternate CI platform
- You want full control over Branch Deployment configuration
If you use GitHub for version control or want Dagster to automate branch deployments, see "Setting up branch deployments" and choose the GitHub tab.
Prerequisites
Using Branch Deployments requires setting up two components: the Branch Deployment agent and CI platform. You'll need:
- Organization Admin permissions in Dagster+
- To install the
dagster-cloudCLI - The ability to configure your CI platform
- The ability to run a new agent in your infrastructure. This isn't required if you're using Serverless deployment.
Step 1: Generate a Dagster+ agent token
In this step, you'll generate a token for the Dagster+ agent. The Dagster+ agent will use this to authenticate to the agent API.
- Sign in to your Dagster+ instance.
- Click the user menu (your icon) > Organization Settings.
- In the Organization Settings page, click the Tokens tab.
- Click the + Create agent token button.
- After the token has been created, click Reveal token.
- Copy the token somewhere safe, since you'll need it to complete the setup.
Step 2: Create and configure an agent
If you're using Serverless deployment, this step isn't required. Skip to step 3
While you can use your existing production agent, we recommend creating a dedicated branch deployment agent. This ensures that your production instance isn't negatively impacted by the workload associated with branch deployments.
Using the tabs, select your agent type to view instructions.
- Amazon ECS
- Docker
- Kubernetes
-
Deploy an ECS agent to serve your branch deployments. Follow the ECS agent setup guide, making sure to set the Enable Branch Deployments parameter if using the CloudFormation template. If you are running an existing agent, follow the upgrade guide to ensure your template is up-to-date. Then, turn on the Enable Branch Deployments parameter.
-
Create a private Amazon Elastic Registry (ECR) repository. Refer to the AWS ECR documentation for instructions.
After the repository has been created, navigate back to the list of ECR repositories.
In the list, locate the repository and its URI:

-
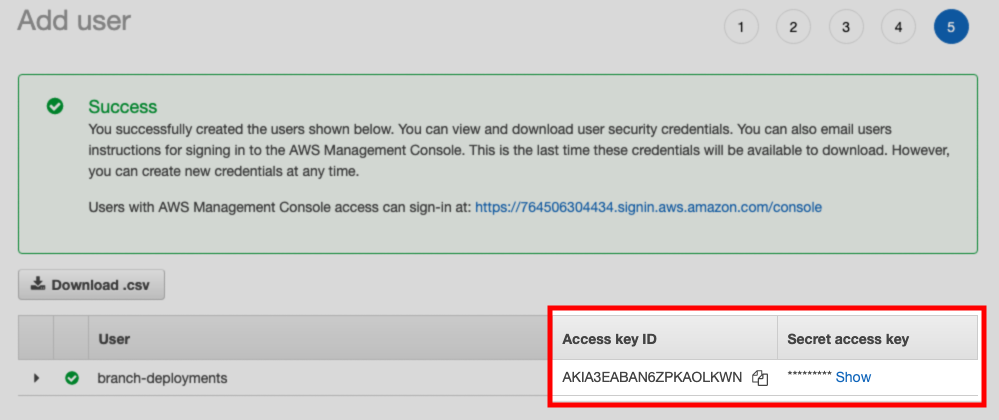
Create an IAM user. This user must:
- Have push access to the ECR repository, and
- Have programmatic access to AWS using an access key
After the user is created, save the Access key ID and Secret access key values shown on the confirmation page:
-
Set up a new Docker agent. Refer to the Docker agent setup guide for instructions.
-
After the agent is set up, modify the
dagster.yamlfile as follows:- Set the
dagster_cloud_api.branch_deploymentsfield totrue - Remove any
deploymentfield(s)
For example:
# dagster.yaml

instance_class:
  module: dagster_cloud.instance
  class: DagsterCloudAgentInstance

dagster_cloud_api:
  agent_token: <YOUR_AGENT_TOKEN>
  branch_deployments: true ## true enables branch deployments

user_code_launcher:
  module: dagster_cloud.workspace.docker
  class: DockerUserCodeLauncher
  config:
    networks:
      - dagster_cloud_agent
    server_ttl:
      enabled: true
ttl_seconds: 7200 #2 hours - Set the
-
Set up a new Kubernetes agent. Refer to the Kubernetes agent setup guide for instructions.
-
After the agent is set up, modify your Helm values file to include the following:
dagsterCloud:
  branchDeployments: true
---
workspace:
  serverTTL:
    enabled: true
    ttlSeconds: 7200
Step 3: Create a branch deployment using the dagster-cloud CLI
Next, you'll create a branch deployment using the dagster-cloud CLI. When the state of a branch or merge request is updated, Dagster+ first expects these steps to occur:
-
A new image containing your code and requirements is built on the branch. Refer to the Dagster code requirements guide.
-
The new image is pushed to a Docker registry accessible to your agent. Note: The following examples assume the registry URL and image tag are stored in the
LOCATION_REGISTRY_URLandIMAGE_TAGenvironment variables, respectively.
After the above has occurred:
-
Use the
dagster-cloudCLI to create a branch deployment associated with the branch, as follows:BRANCH_DEPLOYMENT_NAME=$(
dagster-cloud branch-deployment create-or-update \
--organization $ORGANIZATION_NAME \
--api-token $DAGSTER_CLOUD_API_TOKEN \ # Agent token from Step 1
--git-repo-name $REPOSITORY_NAME \ # Git repository name
--branch-name $BRANCH_NAME \ # Git branch name
--commit-hash $COMMIT_SHA \ # Latest commit SHA on the branch
--timestamp $TIMESTAMP # UTC unixtime timestamp of the latest commit
)One or more additional parameters can optionally be supplied to the
create-or-updatecommand to enhance the Branch Deployments UI in Dagster+:BRANCH_DEPLOYMENT_NAME=$(
dagster-cloud branch-deployment create-or-update \
--organization $ORGANIZATION_NAME \
--api-token $DAGSTER_CLOUD_API_TOKEN \
--git-repo-name $REPOSITORY_NAME \
--branch-name $BRANCH_NAME \
--commit-hash $COMMIT_SHA \
--timestamp $TIMESTAMP
--code-review-url $PR_URL \ # URL to review the given changes, e.g.
# Pull Request or Merge Request
--code-review-id $INPUT_PR \ # Alphanumeric ID for the given set of changes
--pull-request-status $PR_STATUS \ # A status, one of `OPEN`, `CLOSED`,
# or `MERGED`, that describes the set of changes
--commit-message $MESSAGE \ # The message associated with the latest commit
--author-name $NAME \ # A display name for the latest commit's author
--author-email $EMAIL \ # An email for the latest commit's author
--author-avatar-url $AVATAR_URL # An avatar URL for the latest commit's author
--base-deployment-name $BASE_DEPLOYMENT_NAME # The main deployment that will be compared against. Default is 'prod'
)If the command is being executed from the context of the git repository, you can alternatively pull this metadata from the repository itself:
BRANCH_DEPLOYMENT_NAME=$(
    dagster-cloud branch-deployment create-or-update \
        --organization $ORGANIZATION_NAME \
        --api-token $DAGSTER_CLOUD_API_TOKEN \
        --git-repo-name $REPOSITORY_NAME \
        --branch-name $BRANCH_NAME \
        --read-git-state # Equivalent to passing --commit-hash, --timestamp
                         # --commit-message, --author-name, --author-email
) -
Deploy the code to the branch deployment:
dagster-cloud deployment add-location \
    --organization $ORGANIZATION_NAME \
    --deployment $BRANCH_DEPLOYMENT_NAME \
    --api-token $DAGSTER_CLOUD_API_TOKEN \
    --location-file $LOCATION_FILE \
    --location-name $LOCATION_NAME \
    --image "${LOCATION_REGISTRY_URL}:${IMAGE_TAG}" \
    --commit-hash "${COMMIT_SHA}" \
    --git-url "${GIT_URL}"
Refer to the Code location guide for more info on how a location's details are specified.
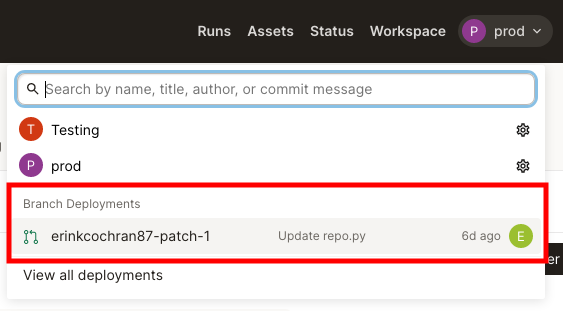
Step 4: Access the branch deployment
Now that Branch Deployments are configured, you can check out the preview in Dagster+.
Click the deployment switcher to view your workspace's branch deployments: